


If building and deploying REST APIs on on-premise servers is not strange to you and you are curious about how to do it in a serverless fashion, you are at the right place. This guide will show you how to build and deploy a simple REST API on AWS. There are multiple ways of achieving this goal, but in this guide, we will go through by using AWS Console clicking buttons and also by utilizing infrastructure as a code concept using the CloudFormation template.
Prerequisites
- AWS Account
- AWS CLI installed
Intro
Just like the name Amazon Web Services itself suggests, the concept of serverless computing on AWS consists of using services created and managed by Amazon. There are more than 200 services available and for the purpose of this guide we will use only two of them, Amazon API Gateway and Amazon Lambda. A list of all available services can be found here.
- Amazon API Gateway - fully managed service that makes it easy for developers to create, publish, maintain, monitor, and secure APIs at any scale. (Ref.)
- Amazon Lambda - serverless, event-driven compute service that lets you run code for virtually any type of application or backend service without provisioning or managing servers. (Ref.)
The REST API we are going to build is the so-called "what's my IP" and it will consist of one simple GET endpoint that returns the current user IP address in a JSON format. Let's get started.
1. Deploy using AWS Console
Steps
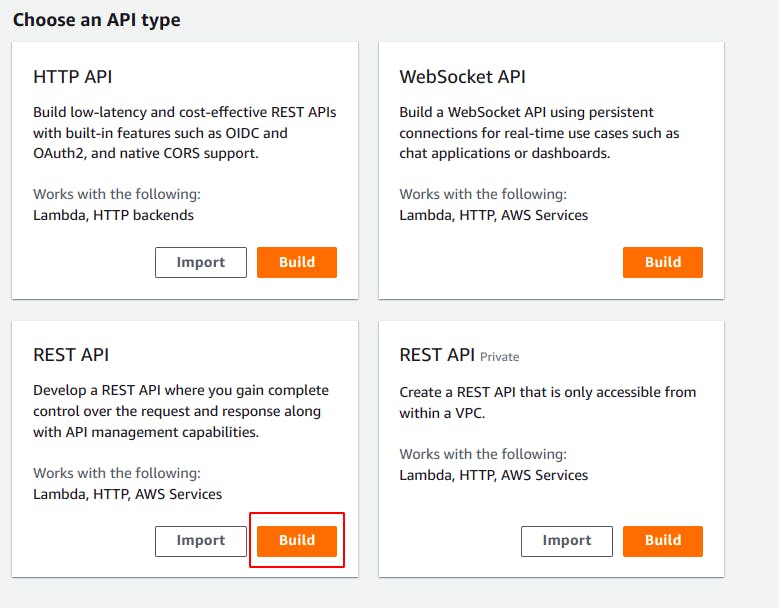
- In the AWS console navigate API Gateway > Create API > REST API > Build.
- Select the New API option, fill in the name as shown on the screenshot below, and click on the Create API button.
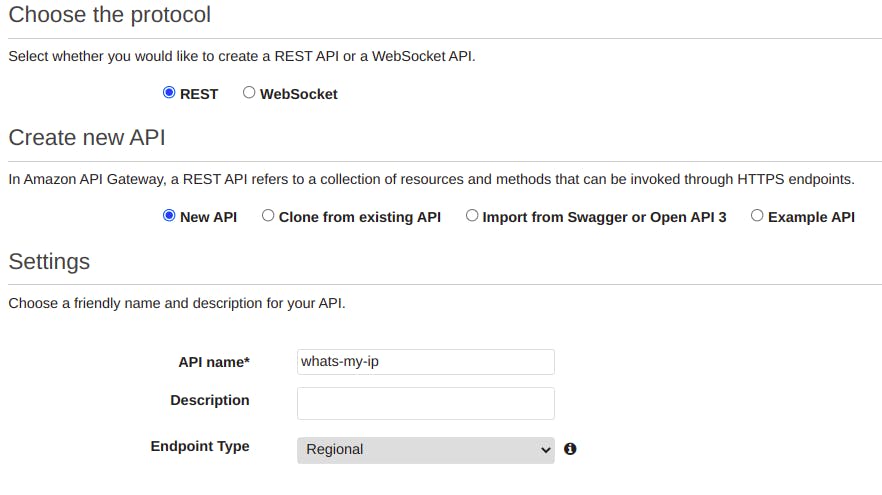
Endpoint type Regional means that the API will be deployed in the current account region. The current region can be found in the top right corner of the AWS console. It's out of the scope of this guide so I won't get into much more details. More about regions can be found here.
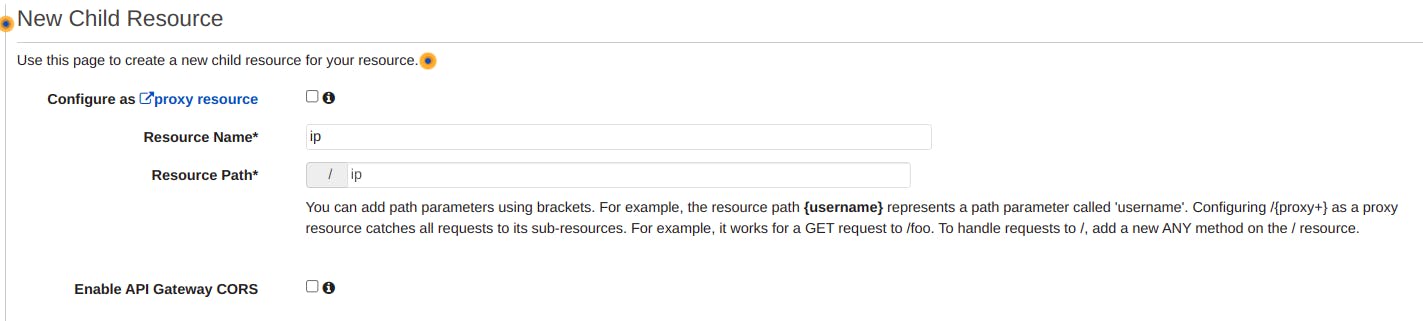
Now when we have an API created, navigate Actions > Create Resource. The resource represents an API endpoint. We are going to set the name and path as ip.
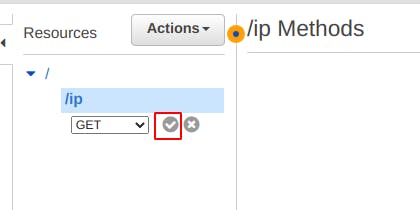
To be able to access the created resource we need to assign a method to it. In our case, it will be a GET method and we can do it by navigating Actions > Create Method.
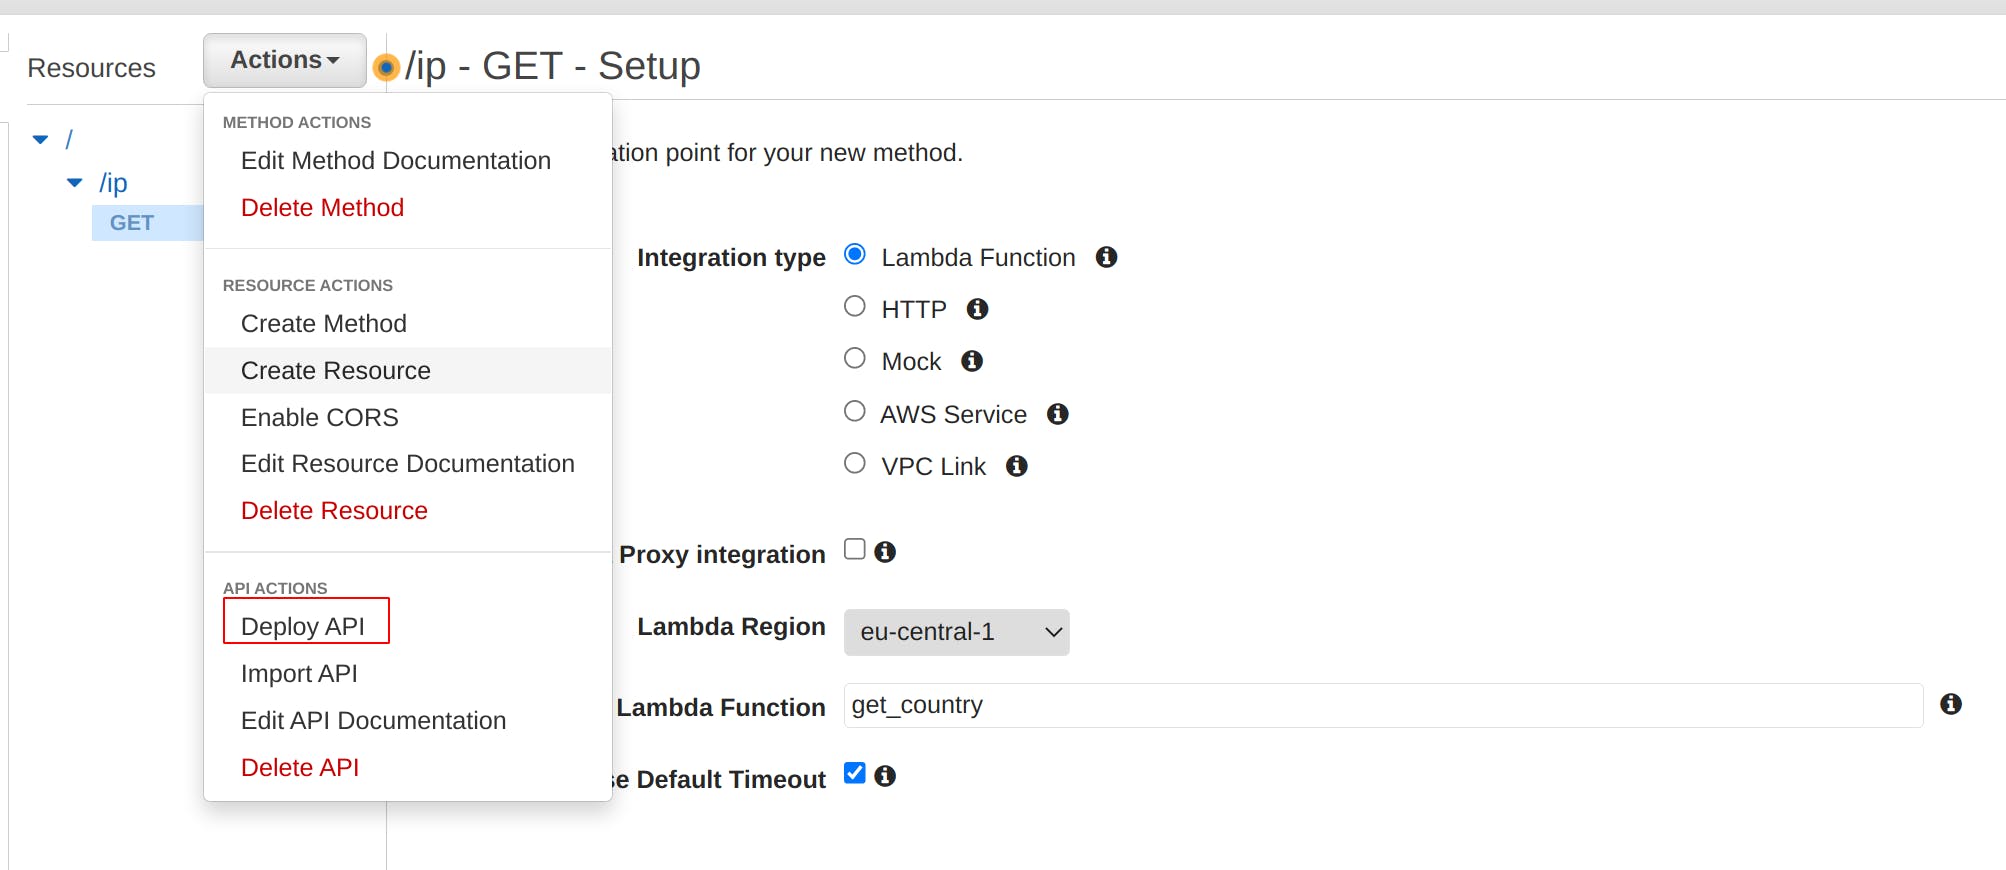
Selecting the newly created GET method you can see various integration type options. In order to write our own logic on the backend side of an endpoint, we are going to use the Lambda Function integration type. Set the configuration as shown in the screenshot down below.
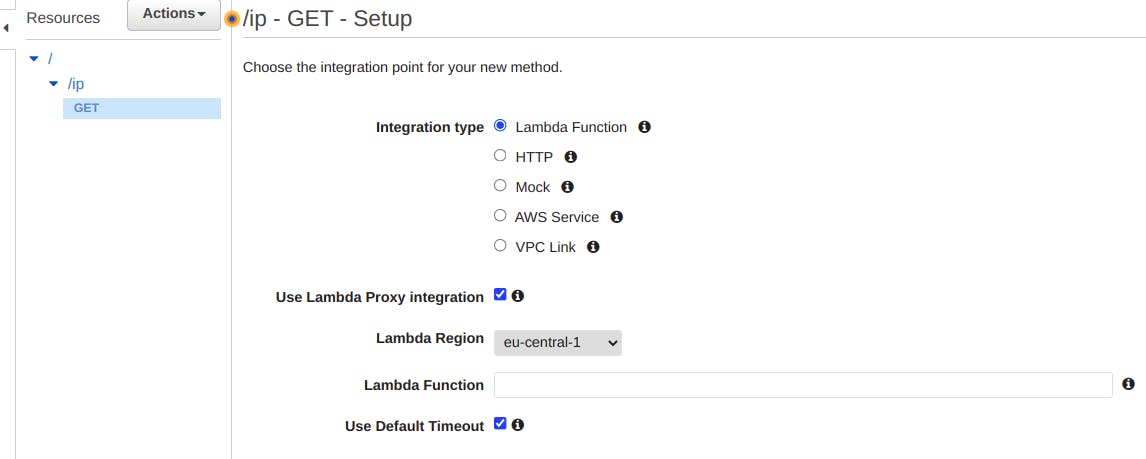
Before connecting Lambda Function and filling in the Lambda function name field, we first need to create one, so let's do that.
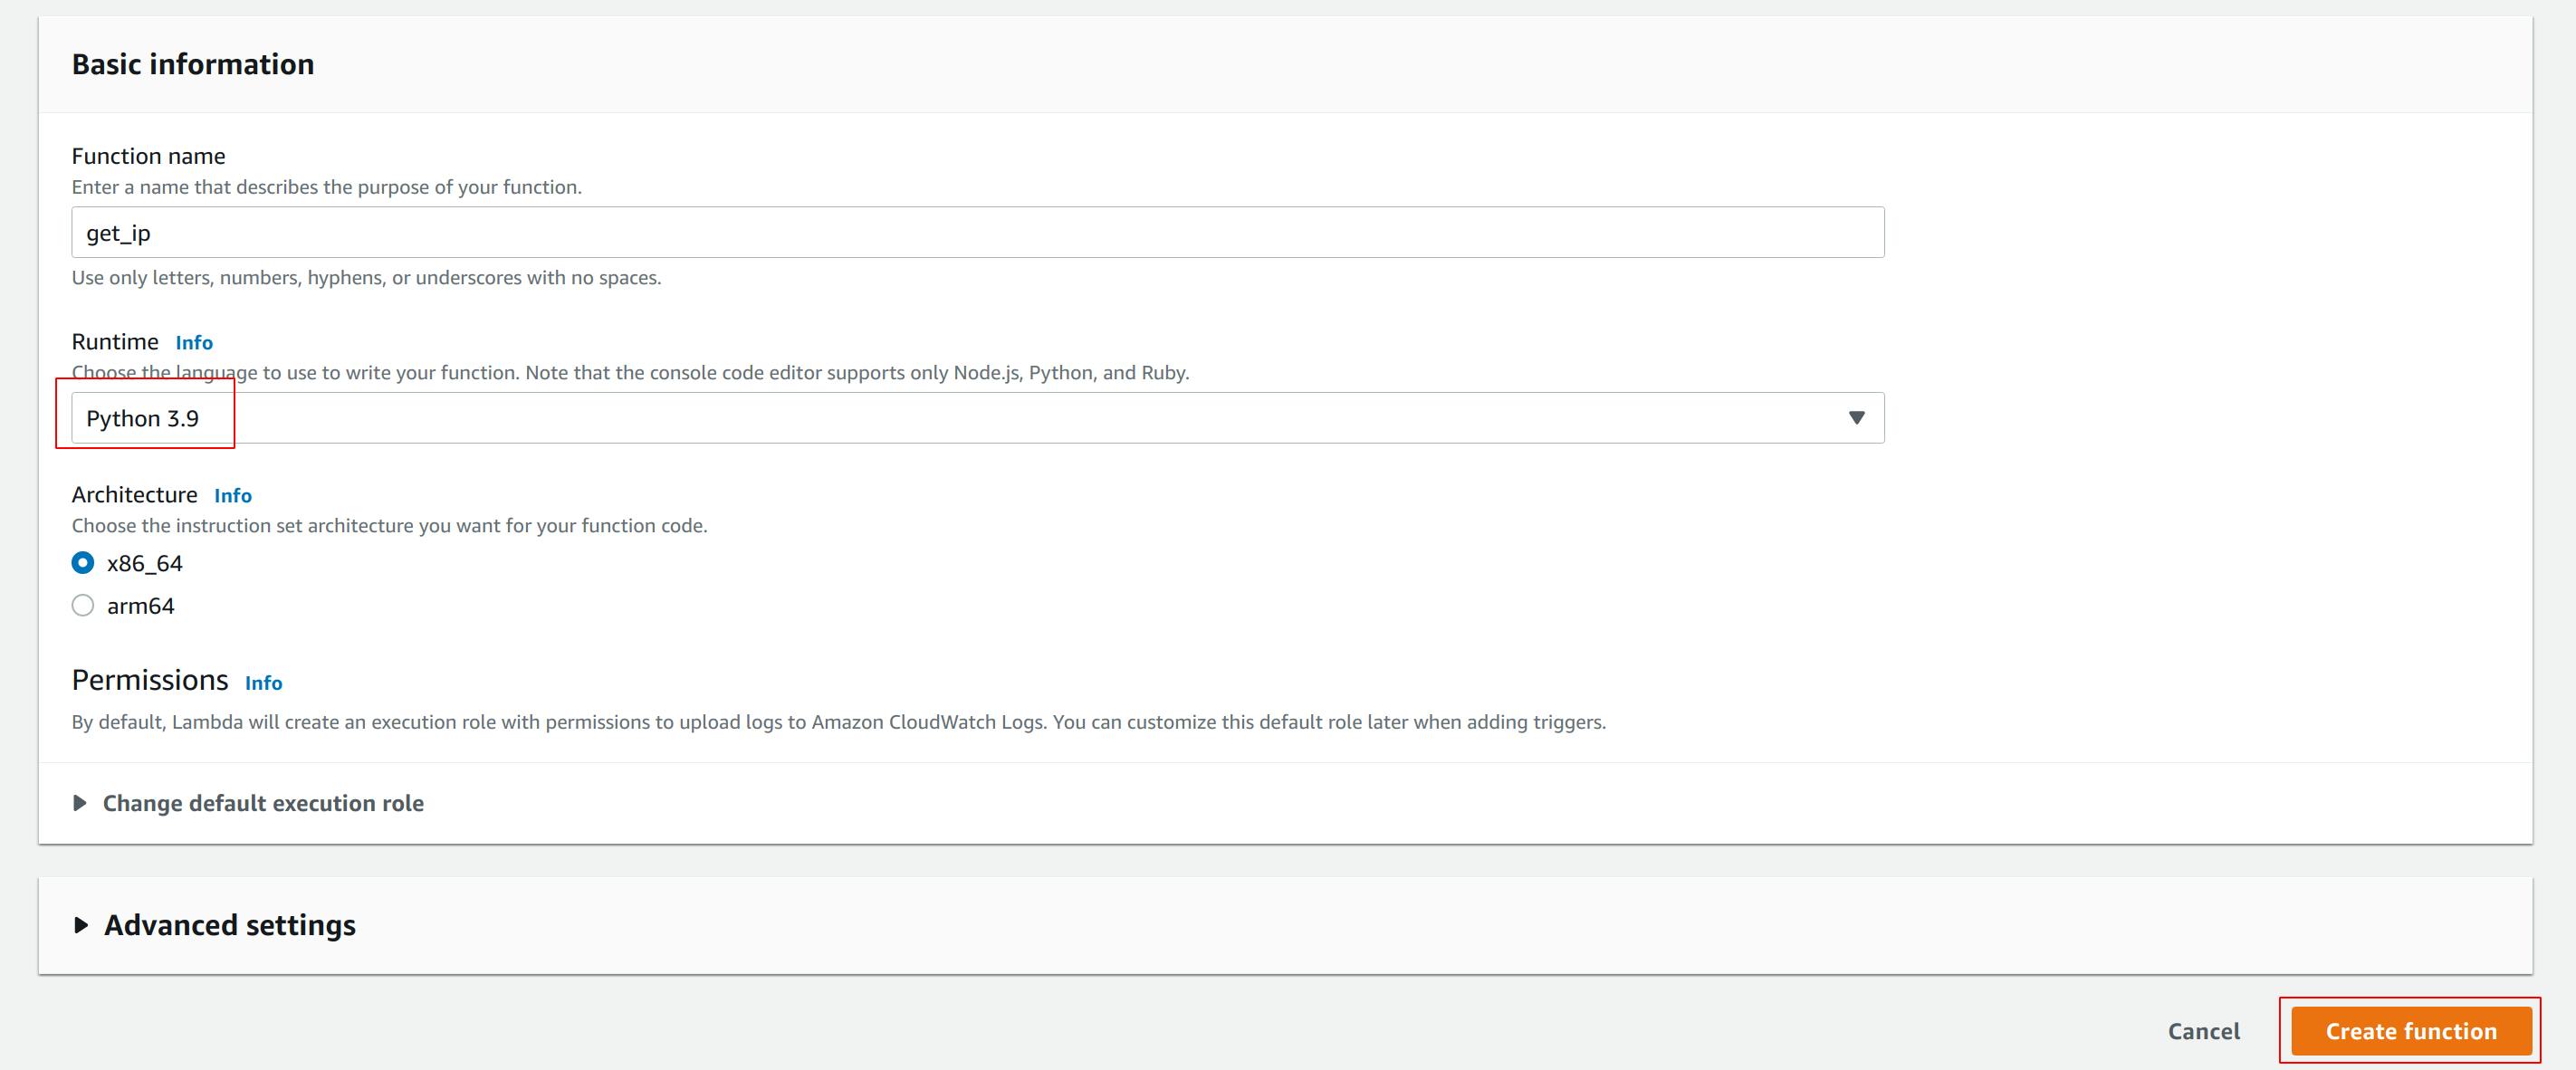
Navigate Lambda > Create function and select Python 3.9 Runtime. The name is provisional but the best practice is to set it as something descriptive of an endpoint we are going to be connecting to. To create a function click on the Create function button.
 After the function has been created we can start writing our own code. Replace the given example with the following code snippet and then deploy the changes by clicking the Deploy button above the code section.
import json


def lambda_handler(event, context):
    ip_address = event['requestContext']['identity']['sourceIp']
    return {
        'body': json.dumps({"ip_address": ip_address}),
        'headers': {
            'Content-Type': 'application/json'
        },
        'statusCode': 200
    }
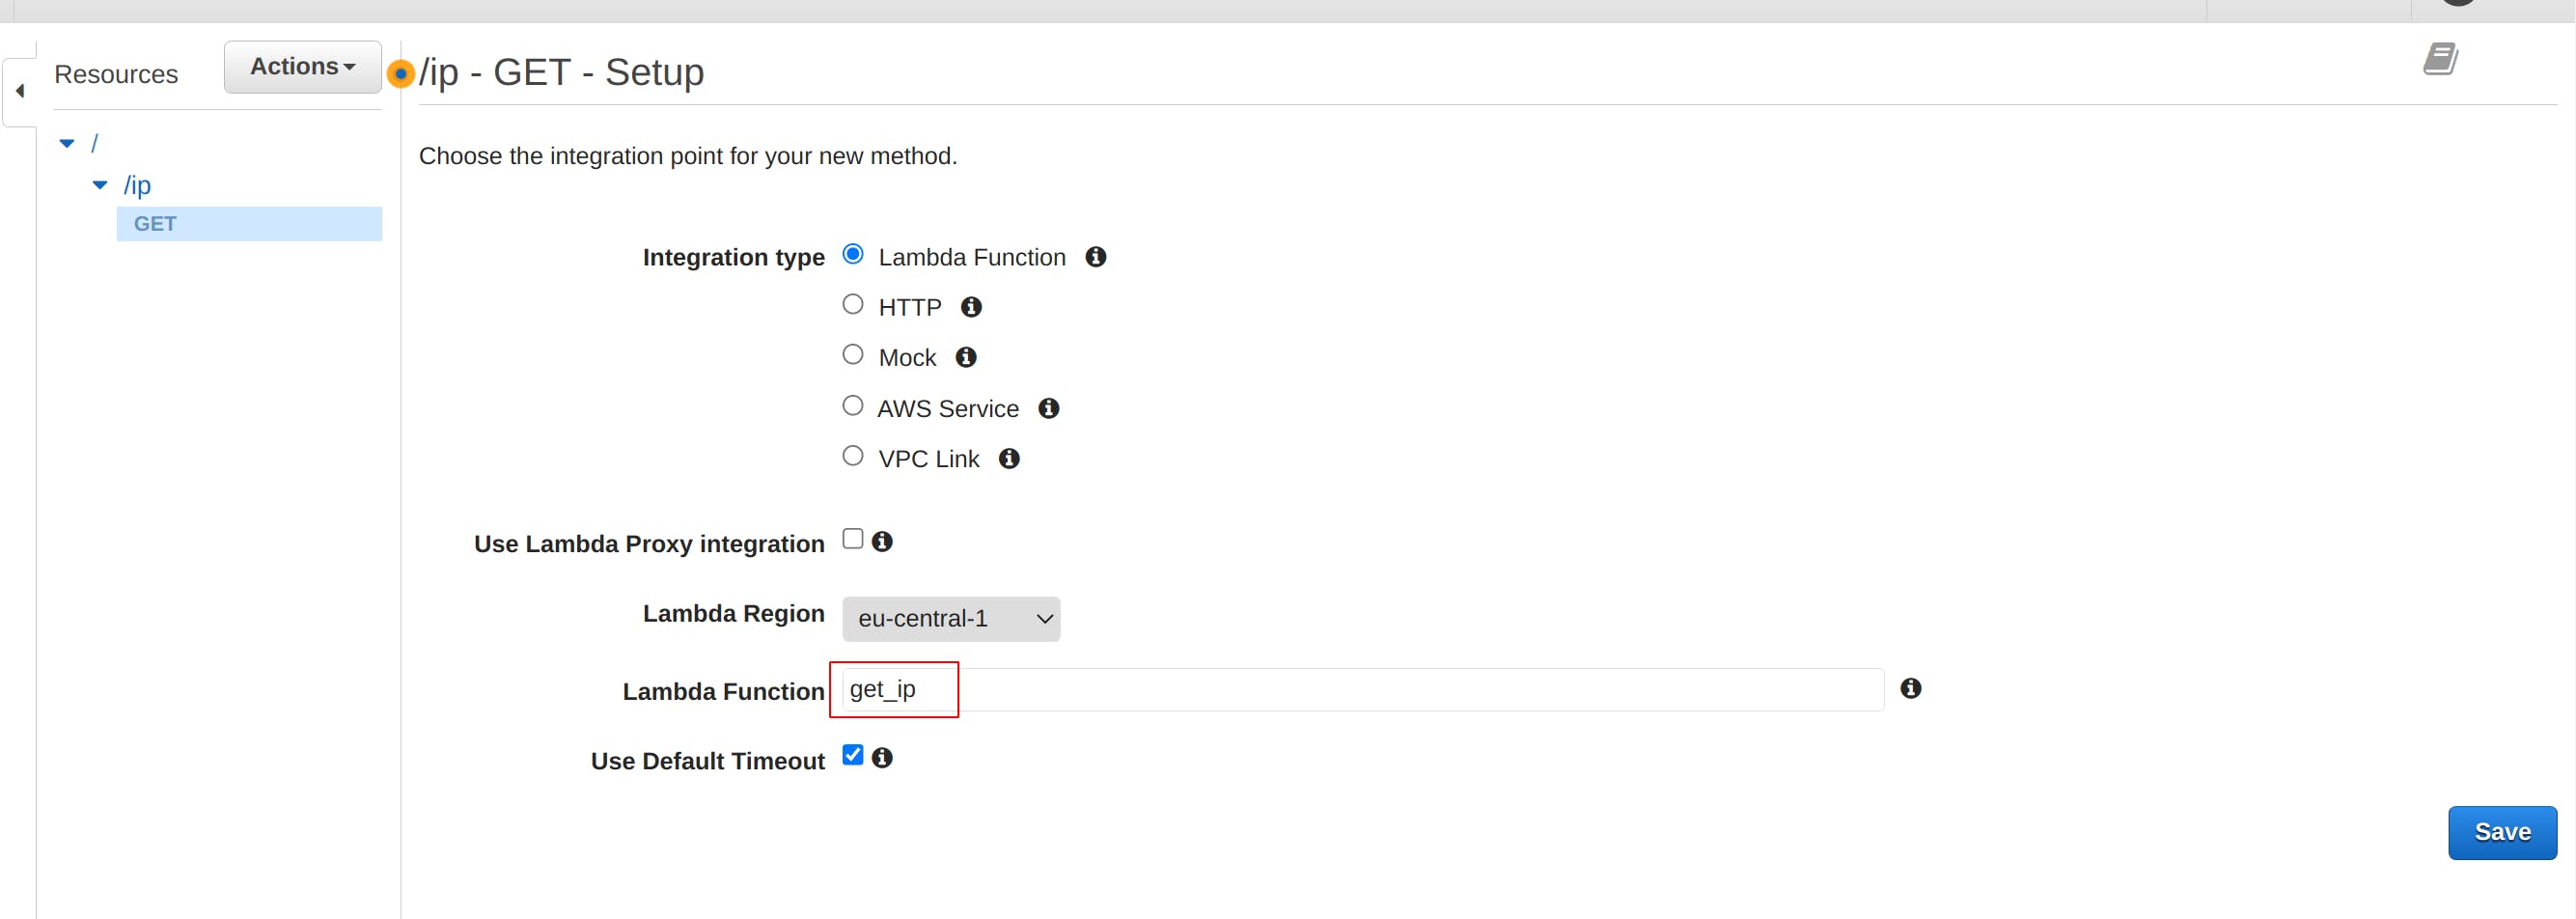
In the given code we get an IP from the event variable and then we return it as a body parameter. In order to use this newly created Lambda function, we need to connect it to our endpoint. Go back to API Gateway resources and fill in the lambda function field as shown in the screenshot below and click on the Save button.
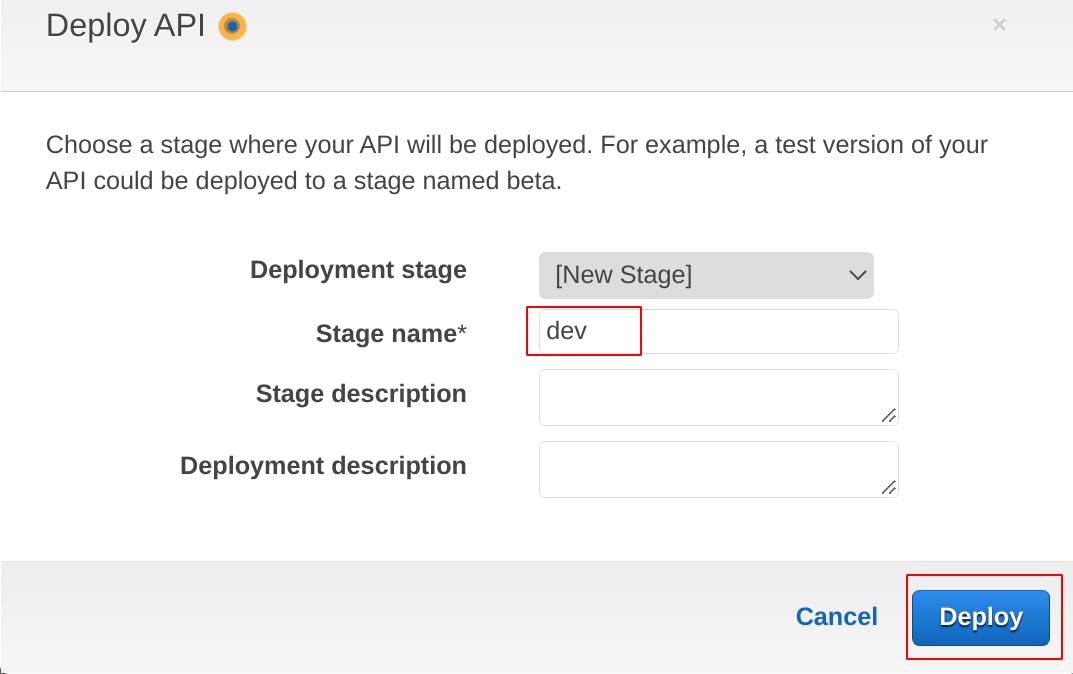
We are almost finished, in order to use an API we need to deploy it by navigating Actions > Deploy API.
Create a new stage and press Deploy.
You should now be able to invoke the API using the url provided in Stages > dev > ip > GET path.
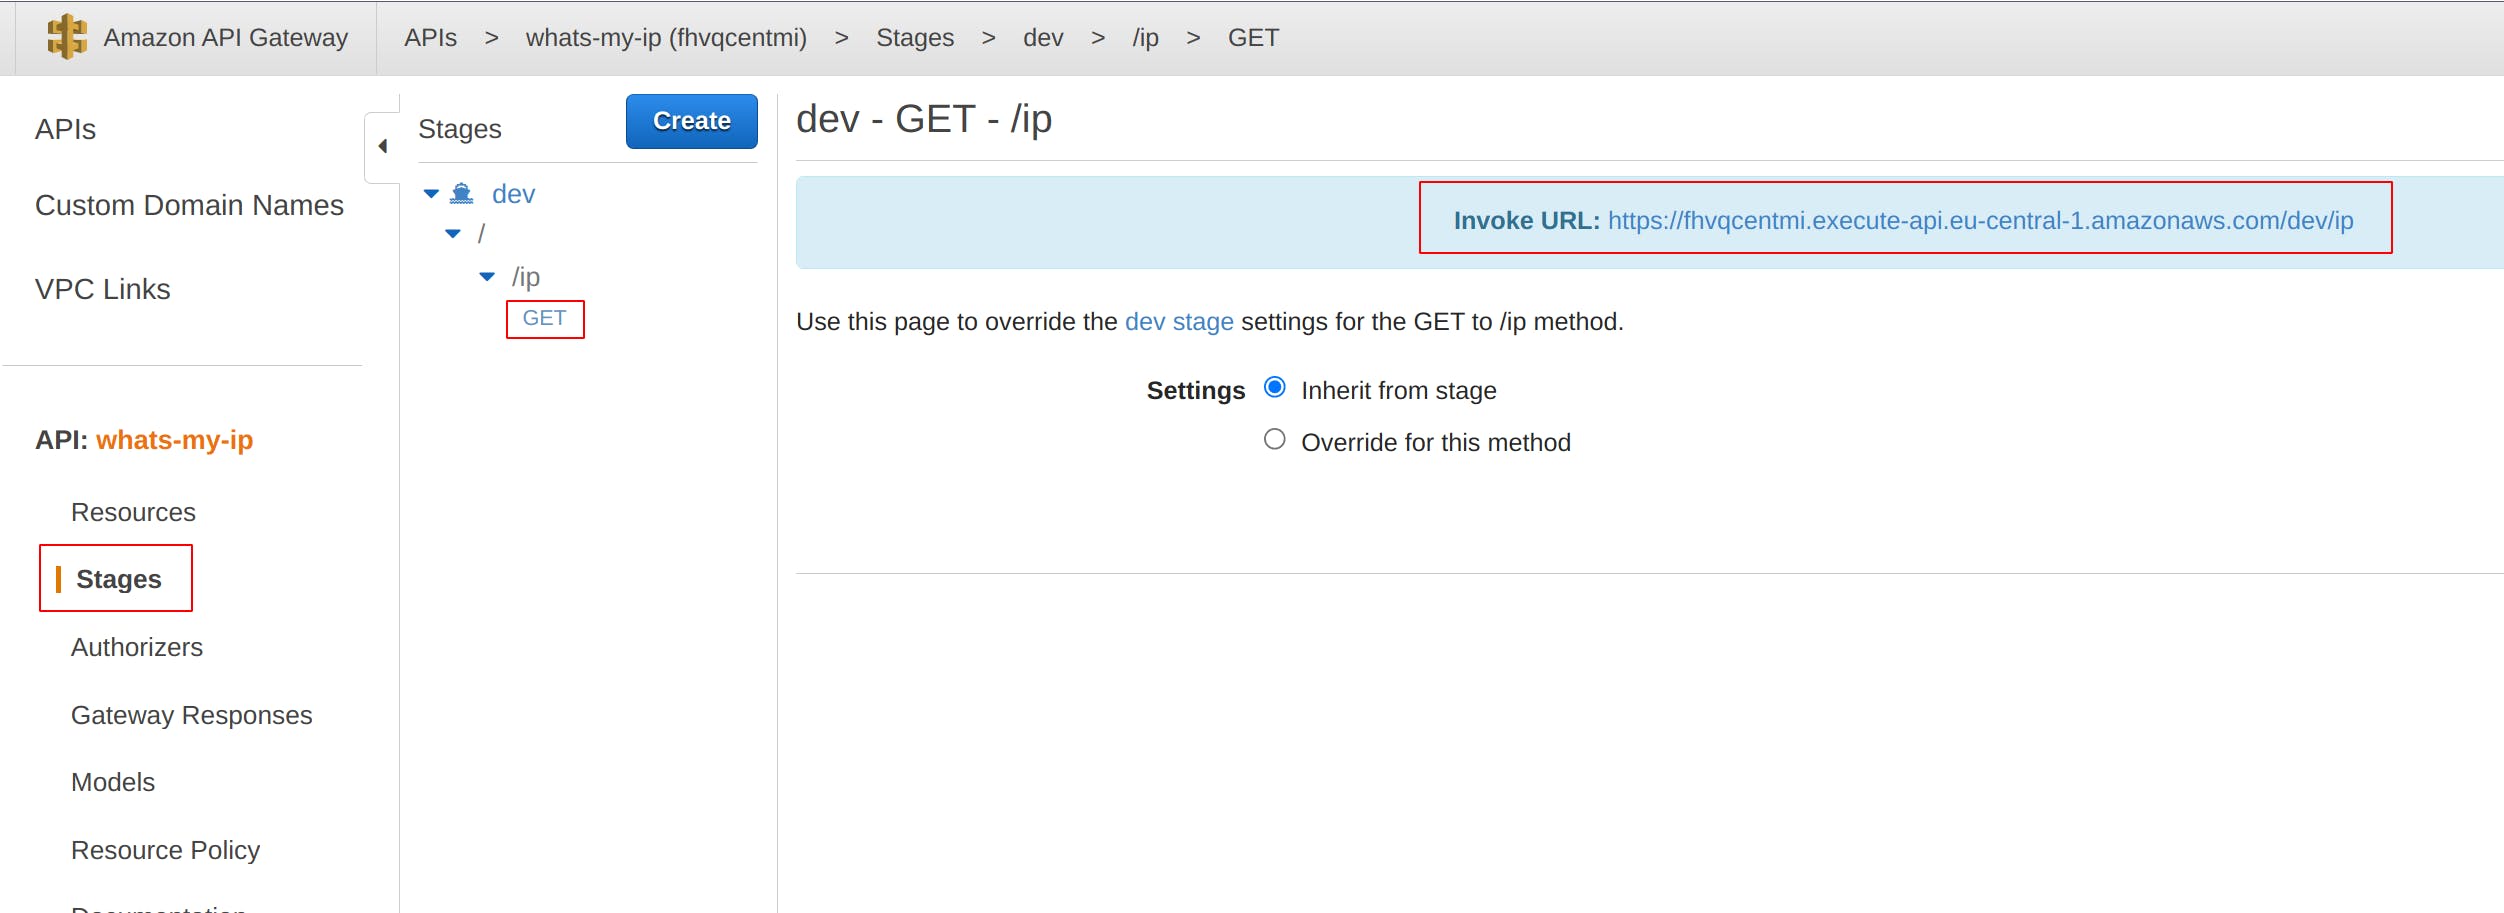 Output should be in JSON format as follows:
{"ip_address": "223.91.73.113"}
2. Deploy using AWS CloudFormation
During the Console process at one point, you probably thought
this should be easier and done programmatically
and you were right. There is a way of achieving the same thing by utilizing the infrastructure as a code concept using the CloudFormation service.
- AWS Cloudformation - a service that gives developers and businesses an easy way to create a collection of related AWS and third-party resources, and provision and manage them in an orderly and predictable fashion. (Ref.)
Infrastructure as a code is a concept of managing infrastructure using some sort of configuration files. In our case that would be managing AWS resources using the CloudFormation template in YAML format instead of clicking around the console. To achieve such a thing we first need to understand how to construct mentioned template. The structure of the CloudFormation template looks as follows:
---
AWSTemplateFormatVersion: "version date"

Description:
  String

Metadata:
  template metadata

Parameters:
  set of parameters

Rules:
  set of rules

Mappings:
  set of mappings

Conditions:
  set of conditions

Transform:
  set of transforms

Resources:
  set of resources

Outputs:
  set of outputs
We are going to stick with the Resources section only. Full template anatomy can be found on this URL.
The Resources section correlates to the resources we clicked on in the console. For example, API Gateways REST API would be a resource, and endpoint configuration would be its property, Lambda function would be a resource and its property would be a code, and so on. A complete replica of REST API made using console looks as follows:
AWSTemplateFormatVersion: '2010-09-09'

Description: REST API using AWS API Gateway with a Lambda Integration

Resources:

  SimpleRestAPI:
    Type: AWS::ApiGateway::RestApi
    Properties:
      Description: REST API that gets users IP
      EndpointConfiguration:
        Types:
          - REGIONAL
      Name: whats-my-ip-cf

  ApiGatewayResource:
    Type: AWS::ApiGateway::Resource
    Properties:
      ParentId: !GetAtt SimpleRestAPI.RootResourceId
      PathPart: 'ip'
      RestApiId: !Ref SimpleRestAPI

  ApiGatewayMethod:
    Type: AWS::ApiGateway::Method
    Properties:
      HttpMethod: GET
      AuthorizationType: NONE
      Integration:
        Credentials: !GetAtt ApiGatewayIamRole.Arn
        IntegrationHttpMethod: POST
        Type: AWS_PROXY
        Uri: !Sub 'arn:aws:apigateway:${AWS::Region}:lambda:path/2015-03-31/functions/${LambdaFunction.Arn}/invocations'
      ResourceId: !Ref ApiGatewayResource
      RestApiId: !Ref SimpleRestAPI

  ApiGatewayModel:
    Type: AWS::ApiGateway::Model
    Properties:
      ContentType: 'application/json'
      RestApiId: !Ref SimpleRestAPI
      Schema: {}

  ApiGatewayStage:
    Type: AWS::ApiGateway::Stage
    Properties:
      DeploymentId: !Ref ApiGatewayDeployment
      Description: REST API dev stage
      RestApiId: !Ref SimpleRestAPI
      StageName: 'dev'

  ApiGatewayDeployment:
    Type: AWS::ApiGateway::Deployment
    DependsOn: ApiGatewayMethod
    Properties:
      Description: Lambda API Deployment
      RestApiId: !Ref SimpleRestAPI

  LambdaFunction:
    Type: AWS::Lambda::Function
    Properties:
      Code:
        ZipFile: |
          import json
          def lambda_handler(event, context):
              ip_address = event['requestContext']['identity']['sourceIp']
              return {
                  'body': json.dumps({"ip_address": ip_address}),
                  'headers': {
                      'Content-Type': 'application/json'
                  },
                  'statusCode': 200
              }

      Description: AWS Lambda function
      FunctionName: 'get_ip'
      Handler: index.lambda_handler
      MemorySize: 256
      Role: !GetAtt LambdaIamRole.Arn
      Runtime: python3.9
      Timeout: 60

  ApiGatewayIamRole:
    Type: AWS::IAM::Role
    Properties:
      AssumeRolePolicyDocument:
        Version: '2012-10-17'
        Statement:
          - Sid: ''
            Effect: 'Allow'
            Principal:
              Service:
                - 'apigateway.amazonaws.com'
            Action:
              - 'sts:AssumeRole'
      Path: '/'
      Policies:
        - PolicyName: LambdaAccessPolicy
          PolicyDocument:
            Version: '2012-10-17'
            Statement:
              - Effect: 'Allow'
                Action: 'lambda:*'
                Resource: !GetAtt LambdaFunction.Arn

  LambdaIamRole:
    Type: AWS::IAM::Role
    Properties:
      AssumeRolePolicyDocument:
        Version: '2012-10-17'
        Statement:
          - Effect: 'Allow'
            Principal:
              Service:
                - 'lambda.amazonaws.com'
            Action:
              - 'sts:AssumeRole'
      Path: '/'
In order to see the end result of the given template, we need to deploy it. To do so we are going to use AWS CLI and run the following command:
aws cloudformation deploy \
  --template template.yml \
  --stack-name restapi-cloudformation --capabilities CAPABILITY_IAM
After running the command in the console under the CloudFormation services tab we should see a newely created CloudFormation stack as shown in the screenshot below.

Congratulations, you have successfully created an API using AWS CloudFormation. You can invoke it the same way as described before.
Thank you for reading.